- The Overhead Athlete's Edge
- Posts
- Deciphering Medical Imaging, Pt. II
Deciphering Medical Imaging, Pt. II
A Patient's Guide to Understanding Knee Imaging
Dr. Sam Bell DPT, MS, ATC, PES, PN-1
December 16, 2024
Dear Readers,
After the overwhelming response to our first issue, we're excited to dive back in with a special edition focused entirely on the knee. Why the knee? Well, time and again, patients confide in me that they find themselves nodding along as their doctor points to MRI images, while secretly thinking, "What am I actually looking at here?" Sound familiar? We've all been there! That's exactly why we created this newsletter – to bridge the gap between medical imaging and understanding.
In this issue, we'll walk you through everything you need to know about knee imaging in clear, simple terms. From ligaments to menisci, cartilage to bone, we'll help you understand what those mysterious gray and white images really mean for your health. Let's demystify your knee scans together!
In Focus: A Patient’s Guide to Interpreting Medical Imaging of the Knee
Understanding X-Rays: The Basics
X-rays show the bones of your knee joint. Think of them as shadows – dense structures like bones appear white, while soft tissues appear in shades of gray, and air appears black. They're particularly useful for seeing alignment, arthritis, and fractures.

Key Landmarks on Knee X-Rays
The Three Main Bones
Femur (thighbone) – the large bone at the top
Tibia (shinbone) – the large bone at the bottom
Patella (kneecap) – the circular bone in front
Joint Spaces
Medial (inner) compartment
Lateral (outer) compartment
Patellofemoral (kneecap) compartment
Growth Plates (in children)
Appear as dark lines through the bones that typically disappear around puberty
Different X-Ray Views
Front View (AP)
Shows overall alignment
Best for seeing joint spaces
Shows arthritis severity
Side View (Lateral)
Shows kneecap position
Shows fluid in joint
May indicate some signs of ACL injury/laxity
Sunrise (with knee bent)/Merchant View (knee bent to 45 degrees and taken from the top)
Show kneecap tracking
Reveal patellofemoral arthritis and pathology
What we are looking for on a Knee X-Ray
Narrowing of the joint space on one or both sides
Irregular (or jagged) surfaces of the joint
Obvious breaks or fractures
Normal alignment of bones and positioning of the patella
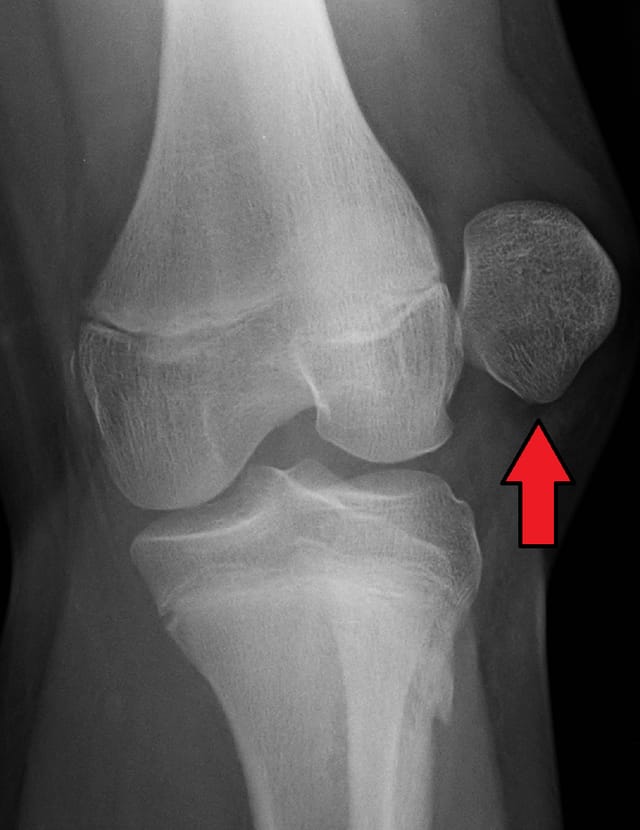
The patella is dislocated laterally, it should be in the center of the knee

Notice the decrease in medial (inside) joint space in the picture on the left.
Understanding your MRI: A Detailed View
MRI’s are challenging to read, even for the most trained eyes. You really need to know your anatomy to decipher what you are looking at. MRIs show soft tissues, such as ligaments and tendons, which X-rays can't capture. Each image is like a slice through your knee from different angles.
There are 2 different types of MRI’s; T2 where the bone & fluid are light colored, and T1 where the bone and fluid is dark).
For example: In a T2- weighted MRI:
Black = Air and dense bone
White = Fluid, swelling, and some tendons
Gray = Most muscles and normal tissues
Dark Gray = Tendons and ligaments
Here is a lateral view of the knee, meaning we are looking at the knee from the side with the slice from almost the exact middle of the knee.

Think you know what injury you are looking at? See if you can figure it out based on the tips and tricks on reading MRIs you learn from this newsletter edition. (The answer will be revealed down below)

Here is an axial view of the knee, meaning we are looking directly above your knee, right in the middle of the joint.

Key Structures to Identify on MRI
Menisci (In the joint space; absorb impact and stabilize the knee)
Appear as dark triangular structures
Located between femur and tibia
One on inner (medial) and one on outer (lateral) side
Should be uniformly dark without breaks
Ligaments
ACL (Anterior Cruciate Ligament)
Appears as a dark diagonal band in the center
Should be continuous without gaps
PCL (Posterior Cruciate Ligament)
Appears as a dark "C" shape behind the ACL
MCL (Medial Collateral Ligament)
Dark band on inner side of knee
LCL (Lateral Collateral Ligament)
Dark band on outer side of knee
Cartilage
Appears as a bright white layer covering bone ends
Should be smooth and even
Visible on both femur and tibia
Patella (Kneecap) Tracking
Position relative to groove in femur
Thickness and condition of cartilage underneath
Common Abnormal Findings
Meniscus Tears
White line going through normally dark meniscus
Irregular shape or fragment
May see "parrot beak" appearance
ACL Tears
Gap in the normal dark band
Wavy appearance
Fluid (white) where ligament should be
Arthritis
Bone spurs (osteophytes)
Irregular cartilage surface on MRI
Patellofemoral Problems
Abnormal tracking of kneecap
Cartilage wear under kneecap
Tilting of the patella
Tips for Viewing Your Images
Understanding Orientation
Remember: Left side of image is usually your right side
Top of image is usually the front of your knee
Dark joint spaces should be even
Questions to Ask
"What is this dark/white area?"
"How does this compare to normal?"
"Can you show me where the problem is?"
I strongly urge you to take a look at this awesome website if you need help navigating your knee MRI.
Remember: While this guide helps you understand your knee imaging, always rely on your healthcare provider's interpretation for medical decisions. Different imaging machines and settings can produce slightly different appearances, so some variation is normal.
Examples of Abnormal Scans

MRI of an ACL tear. Notice the ligament is not attached on the bottom bone (tibia)

MRI of a meniscal tear. Notice the irregularity in the lateral (outside) meniscus.

The change in color consistency within the femur indicates edema, or in this case a bone bruise.
Ask the Expert: How Do I Know If I Need a Knee MRI?
So you have a knee injury, do you need an MRI? Maybe yes, but maybe no, or maybe eventually you will, but it is too early to determine. It really depends on the individual athlete and the situation at hand. For example, if you are a professional baseball player and you have a knee injury in a game during your season and you are removed from play, you can bet you will be getting an MRI of that knee that day to see the extent of injury. After all, Major League Baseball is a business and the GM needs to know ASAP if they will have to make any roster moves based on your injury. This is done to help determine how much time the professional athlete will miss. It doesn’t necessarily change how the injury will be treated. Get it? On the flip side, a recreational athlete in the offseason may benefit from a more conservative assessment and treatment approach before jumping to imaging and surgery talk.
If you are not in the pros and are not sure if you need an MRI, consider these questions:
Does your knee feel unstable? Does it give out when you take a step or try to make a cut? Is this instability affecting how you walk, run, or play your game?
Is your knee getting stuck in certain positions, and do you get sharp pains when this happens?
Did you suffer an acute injury (did it just happen during one specific event) with excessive swelling even days after the injury, especially with a mechanism of injury involving a planted foot.
Have you implemented appropriate recovery strategies since injury and not seen progress in 2-4 weeks?
Do you have sharp pain that doesn’t ebb and flow throughout the day, but rather is consistent and debilitating over the course of multiple days?
Have you seen a sports medicine doc or sports PT who can thoroughly assess your knee?
Are you a high level athlete mid-season with urgency to return to the playing field, or is it the start of the offseason with time to implement a conservative treatment plan?
An MRI is sometimes not totally necessary right off of the bat because the results won’t drastically alter the approach to initial treatment and recovery. MRIs are expensive and at times don’t tell the whole story. On the flip side, an MRI can tell us valuable information including structures involved and extent of injury, which can guide a more specific rehab protocol.
Stay Connected: Join Our Community
Connect with our vibrant online community of fellow overhead athletes, coaches, and sports enthusiasts by giving us a follow on Instagram @TheTrainingRoomOC. Share your experiences, seek advice, and stay updated on the latest developments in sports performance physical therapy for overhead athletes. Together, we can elevate our performance and achieve new heights in our respective sports.
Closing Note:
We sincerely hope this edition has helped illuminate the often complex world of medical imaging and what it reveals about your body's healing journey. When you can better understand what those X-rays, MRIs, and scans are showing, you gain valuable insight into your own health story and gain power in advocating for yourself as a knowledgable member of the conversation. Imaging brings to light the science of our injuries, and serves as a reminder for patience and peace of mind in recovery. We need to respect the healing of the tissues inside, progressing your recovery not too fast, not too slow, but just as your body requires according to its natural healing timeline.
Thank you for embarking on this journey with us through the world of sports performance physical therapy for overhead athletes. We hope you found this issue of "The Overhead Athlete's Edge" insightful and empowering. Stay tuned for more valuable information and inspiration in our next edition. Until then, keep honing your skills, pushing your limits, and trusting the process!
Best regards,
Dr. Sam

